
I love helping people find the perfect homecoming updo that’s equal parts fun and glamorous, and I’ll admit I’ve got a few favorite tricks up my sleeve. Think textured braids, soft tendrils, and crystal pins that survive a night of dancing — with options for every hair length and vibe.
If you want something playful or elegantly polished, I’ve got looks that match your dress and personality, plus styling tips that actually hold up…
Classic Low Chignon With Soft Face-Framing Tendrils

When I’m styling a classic low chignon with soft face-framing tendrils, I always aim for that effortless, ‘I woke up like this but make it fancy’ vibe — it’s the kind of updo that looks polished from across the room yet cozy up close.
I tease the crown lightly, tuck a smooth bun at the nape, and pull delicate tendrils to soften the face for instant romance. Elegant low buns are a timeless choice for weddings and formal events, often inspired by low bun wedding hairstyles that balance sophistication and ease.
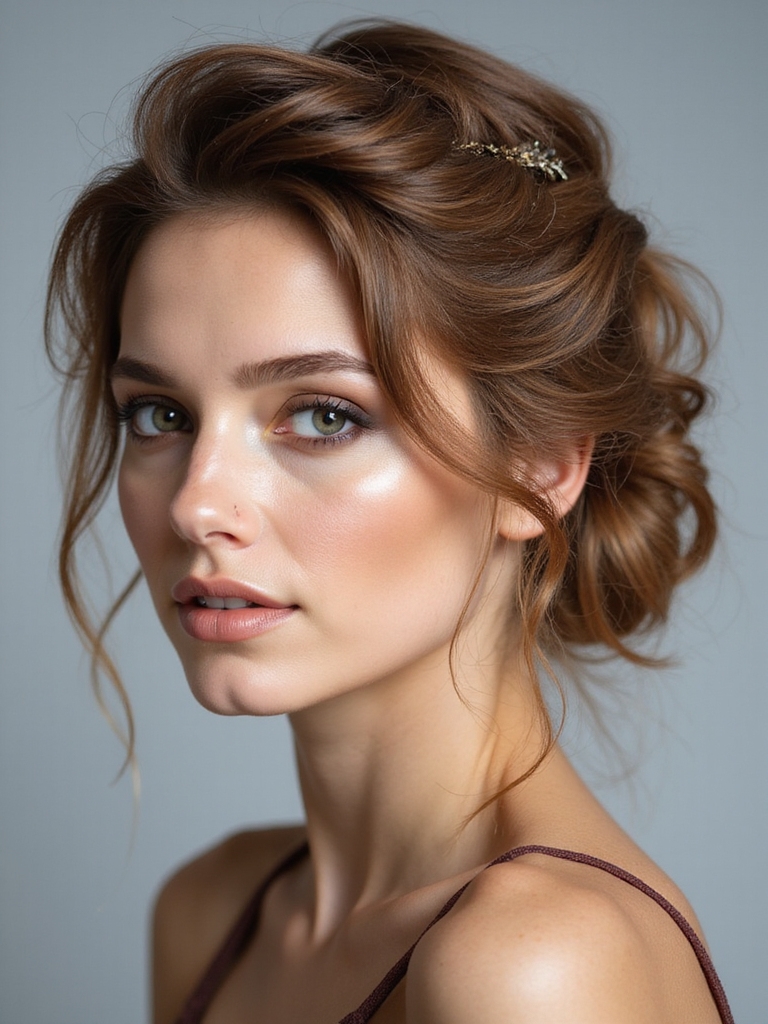
Messy Textured Bun With Braided Crown

If you love the soft-romance feel of that low chignon but want something a little more undone and boho, I’ll show you how to make a messy textured bun feel pulled-together with a braided crown.
I tease for volume, loosely braid along the hairline, then wrap a lived-in bun.
Pull face-framing pieces, set with flexible spray, and tuck ends for effortless polish.
For more polished inspiration, try combining braids and updos like an elegant braided updo to balance romance and structure.
Sleek High Bun With Crystal Pins

Alright, let’s talk about getting that mirror-ready sleek high bun—start by smoothing and prepping your hair so flyaways behave and your finish looks glossy.
I’ll show you how to gather and secure a tight, high bun that stays put through the slow dances and photos.
Then we’ll place crystal pins like little accents—strategic, not overdone—to catch the light without weighing your style down.
For a quick alternative, you can follow a simple step-by-step guide to create a polished messy bun that inspires the same effortless vibe.
Prep and Smoothing
Smoothing starts with clean, dry hair and a little patience — I always work in sections so every strand behaves.
I spritz a heat protectant, blow through with a round brush, then flat-iron small sections for glassy shine.
I tame flyaways with a touch of lightweight serum and a boar-bristle brush, keeping the crown sleek and soft for that polished, crystal-ready finish.
Classy updos often rely on foundational techniques like proper sectioning and secure pinning to maintain shape and longevity, especially for formal events like homecoming—learn more about classic updo techniques.
Secure High Bun
Let’s lock this look in place: I start by gathering the hair high at the crown, smoothing with my boar-bristle brush so there are no bumps, then secure a taut ponytail with an elastic that matches the hair.
I twist, coil, and pin the bun tight for longevity—no wobble at the dance.
- Smooth base
- Tight twist
- Secure pins
- Finish spray
For extra hold on long styles, consider using products and techniques designed for updo hairstyles for long hair to keep the bun intact all night.
Crystal Pin Placement
I usually tuck the crystal pins in last, because they’re the little details that make the whole sleek high bun sing.
I place three varying sizes around the bun’s base—one center back, two staggered—anchoring each with a bobby pin hidden beneath the crystals.
Angle them to catch light, not crowd the silhouette.
Quick, strategic, and totally glam—trust me, it transforms everything.
Twisted Low Knot for Medium-Length Hair

Okay, for a polished twisted low knot I’ll first show you how to prep and add the right texture so the twist stays put.
Then I’ll walk you through the twisted section technique—how to twist, cross, and loop those pieces so they look effortlessly chic.
Finally, I’ll share my go-to tips for securing the knot and finishing with pins, hairspray, and a few face-framing pieces.
Prep and Texture
Starting with the right prep makes the whole twisted low knot fall into place, so I always begin by misting medium-length hair with a salt spray for grit and a lightweight leave-in to keep pieces touchable, not crunchy.
I scrunch, rough-dry, and finger-comb for imperfect texture. Then I add a little dry shampoo at roots.
- Salt spray
- Leave-in
- Dry shampoo
- Finger-comb
Twisted Section Technique
When you’re ready, I take two sections from either side just above the ears and twist them away from the face, keeping tension so the twists look neat but still soft—this is the backbone of the low knot.
I sweep those twists toward the nape, coaxing texture and slight looseness for movement.
It’s quick, flattering, and perfect for medium-length hair that needs a chic, cozy vibe.
Secure and Finish
Now that the twists are tucked at the nape, I secure the knot by looping the ends into a loose bun and pinning through the base with bobby pins that cross like an X — that little crisscross trick locks everything without looking stiff.
I tug face-framing pieces and spritz.
Quick checklist:
- Use strong bobby pins.
- Hide pin ends.
- Add light hairspray.
- loosen for softness.
Romantic Half-Up Messy Bun

If you’re aiming for sweet without trying too hard, I love a romantic half-up messy bun for homecoming because it lets you look polished and carefree at once.
I tease the crown, gather top sections, secure loosely with an elastic, then wrap into a soft bun, pulling face-framing tendrils. A spritz of flexible-hold spray keeps movement natural while staying party-proof.
Fishtail Braid Wrapped Updo

Try a fishtail braid wrapped updo for a look that’s elegant but with a cool, undone vibe I love. I twist a loose fishtail, tug pieces for softness, and pin it into a low wrapped bun—effortless glam that lasts.
Quick spritz, face-framing wisps, and you’re set.
- Texture
- Soft pulls
- Secure pins
- Light hold spray
Voluminous Top Knot With Sleek Sides

I love the contrast of a sky-high, voluminous top knot with sleek, polished sides—it’s drama up top and clean lines around the face.
I tease the crown for lift, smooth sides with serum, then secure a beefy bun that feels couture but moves. It’s my go-to when I want bold height, polished edges, and a look that says I planned every glorious inch.
Vintage-Inspired Victory Roll Updo

I love pulling out the classic victory roll technique for homecoming because it gives instant Old Hollywood drama with surprisingly simple steps.
I’ll show you how to shape those smooth, timeless rolls so they stay put all night, then we’ll chat about picking the perfect retro accessories—think jeweled pins or a polka-dot scarf—to amp the glam.
Believe me, a few smart tools and the right accents turn this vintage look into a modern showstopper.
Timeless Victory Roll Technique
Picture me rolling back the years—literally—as I walk you through the timeless victory roll technique, a vintage-inspired updo that’s equal parts glam and cheeky charm.
I’ll show simple sections, backcombing for lift, smooth rolling and secure pinning so your rolls sit proud all night.
Quick tips follow:
- Section precisely
- Tease at roots
- Roll with tension
- Anchor tightly
Accessorizing for Retro Glam
While you could stop at perfectly shaped rolls, adding the right accessories turns a vintage victory roll into full-on retro glam—so let me show you my favorite, fuss-free options.
I grab jeweled bobby pins, a tiny birdcage veil, or a satin scarf tied just so. Strategic placement highlights the roll without weighing it down.
Quick, chic, and unmistakably vintage.
Loose Boho Updo With Flower Accents

With a few quick twists and a couple of strategically placed bobby pins, I can turn your hair into a loose boho updo that looks effortlessly gathered and festival-ready.
I’ll tuck in tiny blooms, pull face-framing tendrils, and texturize for that just-out-of-bed charm. Ready? Try these tweaks:
- Tease crown lightly
- Twist and pin sections
- Insert small flowers
- Finish with light hairspray
Elegant French Twist With Modern Twist
If you loved the relaxed vibe of that boho updo, let me show you how to sharpen it into an Elegant French Twist with a modern edge that still feels wearable.
I tighten the base, twist with a gentle asymmetry, and tug a few face-framing strands for softness. Add a sleek metallic pin or tiny pearls for glam — timeless, polished, but never stiff.
Double Dutch Braids Pulled Into a Bun

Okay, let’s talk double Dutch: I always start by prepping with a light texturizing spray and crisp sectioning so the braids sit neat all night.
I braid two Dutch strands tight along the scalp, then sweep them into a low bun for a polished-but-playful finish.
Stick a few bobby pins and a spritz of hairspray in—trust me, it survives slow dances and photo ops.
Prep and Sectioning
Before we braid, I always prep the hair so the finished bun looks polished and lasts all night. I detangle, add texture spray, and lightly blow-dry for grip.
Then I map sections—clean center part, equal sides—so braids sit neat. Quick clips keep hair tidy while I work.
- Detangle
- Texture spray
- Center part
- Section and clip
Braids Into Low Bun
I start by braiding two Dutch braids along the scalp, keeping them snug so they’ll hold all night, then tuck and pin both ends into a low, tidy bun at the nape.
I fuss with a few face-framing pieces, pull gently for softness, and secure stray hairs with discreet pins. It’s elegant, comfy, and survives dancing — my go-to for effortless glam.
Faux Hawk Updo With Tousled Waves

I love how the faux hawk updo with tousled waves feels equal parts daring and effortless.
I’ll show you how to rough-texture the crown, pin with confidence, and let face-framing waves flirt.
It’s bold but wearable—perfect if you want edge without drama.
- Tease crown
- Twist sides
- Pin center
- Loosen waves
Low Ponytail Turned Knot With Ribbon Detail

Gather a sleek low ponytail and let’s turn it into a chic knot with a ribbon that actually looks intentional—not like an afterthought.
I loop the pony into a tidy knot, secure discreetly with pins, then thread a satin ribbon through the knot and tie a neat bow.
It’s polished, modern, and so effortless—perfect if you want subtle flair without overdoing it.
Curled Side-Swept Updo With Decorative Comb

Want something a little more romantic than that knotted pony? I twist soft curls to one side, pinning loosely for movement, then slide in a sparkly decorative comb.
It feels effortless but polished—perfect for photos and slow dances.
Quick tips:
- Curl away from face
- Tease crown lightly
- Secure with bobby pins
- Place comb at curve for sparkle
Textured Updo for Short Hair With Statement Clips

Ready to shake up short hair for homecoming? I’ll show you a textured updo that packs major personality—think tousled volume, pinned twists, and bold statement clips.
I’ll work around your length, teasing roots, securing pieces with discreet pins, then adding oversized clips where they pop.
It’s playful, easy to refresh, and gives short hair a red-carpet moment without fuss.
I hope you’re buzzing with ideas — I know I am! If you’re leaning toward a sleek high bun pinned with crystals or a messy braided crown that lets you dance all night, pick what feels like you.
Add a little tease at the crown, some face‑framing tendrils, and a few strategic pins (plus a spritz of texturizer) and you’re photo-ready. Go have fun, experiment, and own that homecoming glow — I can’t wait to see which look you choose!


