
I love how a braided updo can instantly lift your whole vibe—whether you’re running to a meeting or heading out for drinks.
I’ll walk you through styles from soft crown braids to sleek low buns and messy Dutch twists, share quick prep tips for grip and texture, and show how to make each look feel timeless or fresh.
Stick around and I’ll help you pick the perfect braid for your hair and plans.
Soft Crown Braid for a Romantic Finish

I love how a soft crown braid can instantly make even a messy day feel poetic, so let me walk you through the vibe: gentle, romantic, and effortless.
I’ll show you how to tease texture, braid loosely around your head, and pin with hidden bobby pins for that undone elegance.
It’s perfect for date nights or when you just want to feel quietly glamorous.
Cornrow updos are a versatile option that can be adapted for sleek or textured looks, including elegant cornrow updo variations.
Sleek Low Braided Bun for Office Chic

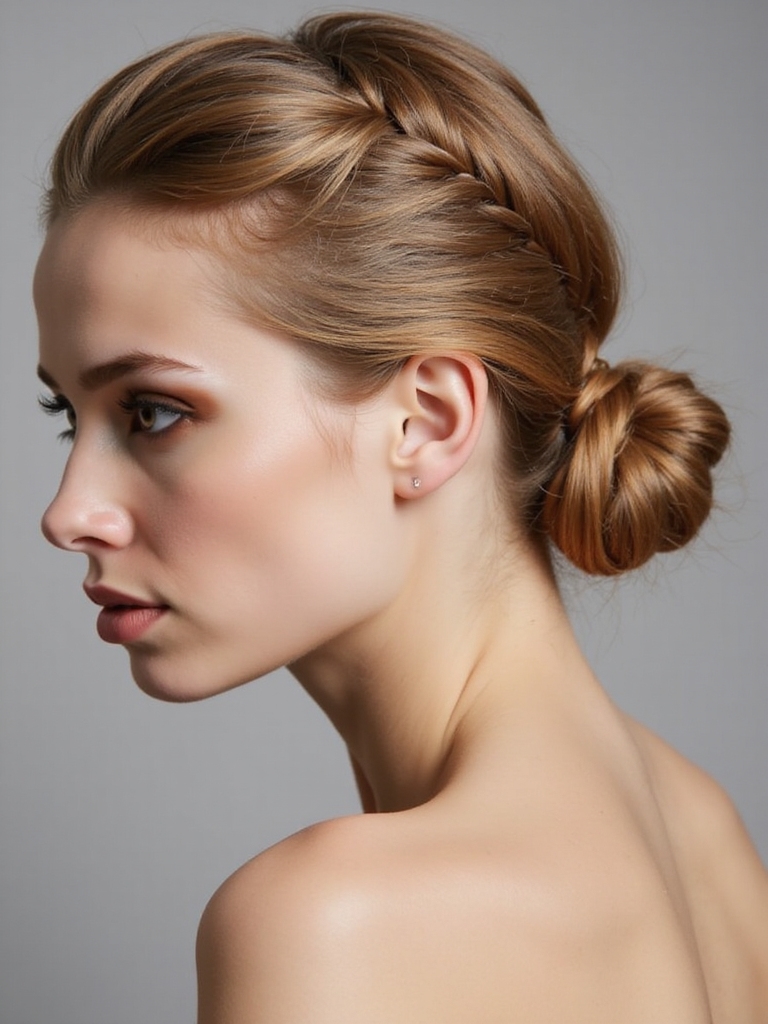
Picture slipping into a boardroom with a sleek low braided bun that screams polished without trying too hard—I’ll show you how to keep it neat, professional, and surprisingly quick.
I braid a clean section, anchor it low at the nape, wrap tightly into a compact bun, and secure with discreet pins.
It stays smooth all day, looks intentional, and boosts confidence—office-ready in minutes.
Long hair makes this style especially versatile and secure, as its length provides ample hair to create a compact braided bun that holds all day.
Messy Side Braid Twisted Into a Bun

Alright, let’s get your hair ready with the right prep and texture so the side braid has grip and movement.
I’ll walk you through a simple braid technique that’s forgiving and perfect for twisting into a messy bun.
Finally, I’ll show how to secure it tightly yet loosen it just enough for that effortless, undone finish.
Braided ponytail styles are versatile and can be adapted for any occasion by adjusting volume and placement, making them a go-to braided ponytail option.
Prep and Texture
Starting with textured hair makes the whole messy side braid-into-bun look come alive—I like to rough it up a bit so the braid reads effortless instead of overworked.
I’ll spritz sea salt, scrunch, and tease roots for grip, then add a touch of dry shampoo for hold.
A few strategically placed texture sprays keep frizz charming, not chaotic, before I braid and twist.
Textured styles like this pair beautifully with braided hairstyles that combine form and function, offering both visual interest and lasting hold.
Braid Technique Basics
Grab a section near one ear and let’s get playful—this braid is all about imperfection, so I keep my tension loose and my fingers nimble.
I French-braid toward the nape, letting strands escape for softness, then switch to a casual three-strand.
I twist that braid into a low side bun, tucking ends neatly.
It reads undone but deliberate, effortlessly chic for day or night.
Braided styles like these draw on a rich tradition of braided hairstyles that celebrate texture and versatility.
Secure and Loosen Finish
Once the braid’s tucked into that low side bun, I focus on how tight I want it to feel — I like a secure base so the style lasts, then I go back in and loosen where I want softness.
I pinch sections, pull tiny face-framing strands, and secure with discreet pins and a light mist. It’s fuss-free, chic, and staysput all day.
Dutch Braided Updo With Loose Tendrils

If you want a look that’s equal parts romantic and a little bit rock‑and‑roll, I love the Dutch braided updo with loose tendrils—it’s tidy where it counts and deliciously undone at the edges.
I braid close to the scalp, twist the tails into a low knot, then tug face‑framing pieces free. It’s effortless, secure, and instantly elevated for day or night.
Fishtail Halo Braid for Boho Vibes

I’m excited to show you how to get that effortless fishtail halo braid with real boho flair, starting with the right prep and texture so the braid holds and looks lived-in.
I’ll walk you through the step-by-step fishtail technique—how to section, cross, and pull for that chunky, messy effect—and then how to secure it cleanly without looking stiff.
Finally, I’ll share the best finishing touches, from pins to hairspray and face-framing tendrils, so your halo stays put and totally chic.
Prep and Texture
Because texture makes or breaks a boho fishtail halo, I always start by prepping hair so it holds shape without feeling crunchy. I spritz a lightweight salt spray, rough-dry for movement, then add a touch of cream for manageability.
I tease lightly at the crown for lift and finger-comb to keep things undone — effortless, touchable, and totally braid-ready.
Braiding Technique Steps
Start by splitting your hair down the middle and working one side at a time so you don’t get overwhelmed—this keeps the halo neat and wearable.
I grab a small outer strand, cross tiny sections into the main piece for that fishtail texture, keeping pulls even and relaxed for boho charm.
Repeat on the other side, matching tension so both halves mirror.
Securing and Finishing Touches
Once you’ve finished matching the tension on both sides, I secure the fishtail halo by tucking the ends under the crown and anchoring them with bobby pins that crisscross for grip—this keeps the braid sitting snug without pulling your hair flat.
I loosen face-framing pieces, mist with flexible spray, then:
- Hide pins with a few strategic twists
- Add tiny flowers or jewels
- Tug loops for softness
Milkmaid Braids Pinned Into an Updo

If you want an easy way to look effortlessly polished, I turn to milkmaid braids pinned into an updo—it’s my go-to for weekends, weddings, and everything in between.
I braid two simple crowns, tuck and pin them over my head, then tweak face-framing bits for softness. It’s quick, romantic, and stays put without fuss—perfect when you want chic with minimal effort.
Braided Chignon With Textured Volume

I love starting a braided chignon by prepping a textured base—sea salt spray, a little dry shampoo, and some teasing where needed to give grip and oomph.
Then I braid sections and pin them into a low, slightly messy chignon so the texture peeks through.
Stick with me and I’ll show how those two steps turn plain hair into a chic, lived-in updo.
Prep Textured Base
Starting with a textured base makes the whole braided chignon sing, so I roughen your hair intentionally—think sea-spray spray, a little backcombing at the crown, and some chunky texturizing cream through the mid-lengths.
I aim for grip without grit, lived-in volume, and smoothish ends. Try these quick tweaks:
- Spray, scrunch, dry for grit
- Tease crown lightly
- Smooth ends with cream
Form Braided Chignon
Gather your sections and tuck in—now we build the chignon. I twist each textured braid into a loose coil at my nape, pinning strategically so volume shows through, not collapses.
I pull tiny loops for softness, secure stray pieces with discreet pins, then mist for hold. It’s polished but lived-in—effortless glamour that stays put and flatters every face shape.
Double Dutch Braids Wrapped Into a Knot

Play with texture and symmetry by weaving two Dutch braids down the sides of my head, then wrapping them into a neat knot at the nape for an effortless, polished look that’ll stay put all day.
I love how chic yet casual it reads — perfect for errands or date night.
- Tame flyaways with light hairspray
- Loosen strands for softness
- Secure with hidden pins and elastics
Rope Braid Twisted Low Bun

Twist two simple rope braids together and you’ll get an instant polished-but-relaxed low bun that feels elevated without trying too hard.
I love this for days when I want neatness with a wink—secure at the nape, tug for softness, and pull out a few face-framing bits.
It’s fuss-free, works on second-day hair, and packs timeless texture with minimal effort.
Accent Braids With a Twisted Top Knot
If you want a look that’s equal parts edgy and effortless, try accent braids feeding into a twisted top knot — I love how the little braids give a neat, intentional vibe without making the whole style feel stiff.
I’ll walk you through quick steps and styling tips:
- Braid small sections near face for framing
- Twist remaining hair into a secure top knot
- Use pins and light-hold spray for polish
Pull-Through Braids Gathered Into a Bun

Love the clean look of accent braids? I turn pull-through braids into a voluminous bun for instant polish. I weave sections, pancake gently for texture, then gather them low or high depending on vibe.
It feels chic but relaxed, sturdy for all-day wear, and perfect when I want effortless detail without fuss. Try adding a few face-framing strands.
Braided Updo With Floral Accessories

With a few sprigs or a single statement bloom, I turn a braided updo into something instantly romantic and party-ready.
I tuck flowers into braids for texture, scent, and effortless charm. Try small blooms for subtlety or one bold bloom for drama. It’s quick, whimsical, and surprisingly modern.
- Fresh mini roses for vintage vibes
- Tiny greenery for movement
- Single orchid for impact
French Braid Crown With Braided Bun

When I want something that reads polished but still feels carefree, I start a French braid crown and finish it in a braided bun for a look that’s both regal and relaxed.
I love how it frames the face, stays neat all day, and translates from brunch to evening effortlessly. Quick touch-ups and a few pins keep it secure—chic without trying too hard.
Braided Updo for Curly and Coily Hair

Switching gears from the polished French braid crown, I’ll show you how to make a braided updo sing on curly and coily hair. I love textures that pop — here’s how I approach it:
- Moisture-first: define curls, reduce frizz.
- Gentle detangling: preserve curl pattern.
- Chunky braids + pins: secure without flattening.
You’ll get lift, shape, and playful movement that feels effortless.
Glam Braided Updo With Sparkling Pins

Okay, let’s talk glam: I’ll show you how the right prep and texture make braids hold and shine, then share smart pin placement tips so your look stays impeccable all night.
I’ll also give quick pointers on positioning those sparkling pins for maximum wow without overdoing it.
You’ll walk away knowing exactly how to balance grip, comfort, and sparkle.
Prep and Texture
Because texture is the secret sauce of any glam braided updo, I always start by prepping hair to hold and shine—never stiffen. I work in light products, rough-dry for grit, then braid.
Quick essentials to try:
- Sea salt spray for grip without crunch
- Lightweight oil on ends for gloss
- Volumizing mousse at roots for lift
It stays touchable and luxe.
Pin Placement Tips
Now that the hair’s got grit and glow, I’ll show you where to stick the sparkle so the whole updo reads polished, not pokey.
I tuck pins at braid intersections and along the crown’s curve, angling them toward the scalp for comfort. Use long pins for structure, short ones for detail, and hide entry points inside folds—secure, invisible, and totally chic.
Accessorizing With Sparkle
With a few well-placed sparkles, your braided updo goes from pretty to paparazzi-ready—I love how tiny accents can change the whole vibe.
I slip in sparkling pins where light hits, then tweak for balance. Try these ideas:
- Clustered pins at the crown for instant glam
- Scattered single crystals for subtle twinkle
- A jeweled comb to anchor a messy braid
So, if you’re heading to work, a wedding, or a weekend brunch, braided updos are your secret style weapon—they’re chic, comfy, and endlessly tweakable.
Try a soft crown braid for romance, a sleek low bun for meetings, or a fishtail halo when you want boho vibes; add flowers or sparkles to dial up the drama. Play around, welcome a little messiness, and have fun—your hair’s about to become your favorite accessory.


