
I love how a simple updo can switch your whole energy—slick low buns say polished and powerful, while high puffs shout bold and carefree.
I’ll walk you through styles that protect your strands and boost your presence, from braided crowns to Marley twist buns, with tips on edges, pins, and accessories that actually work. Stick around—there’s a confident look here begging to be your next signature.
Sleek Low Bun With Defined Edges

When I want a look that’s polished but fuss-free, I reach for a sleek low bun with edges laid—it’s instantly chic and keeps everything off my face.
I smooth hair with a lightweight gel, coil it low, and secure with pins. That defined edge frames my features and reads intentional; it’s versatile for meetings, dates, or days when confidence needs a quick boost.
I also love that bun updos can be effortless yet refined, offering everyday versatility for many occasions.
High Puff With Statement Accessories

I love switching from that sleek low bun to a high puff when I want more height and personality—it’s like trading office polish for bold weekend energy in one move.
I pile my coils high, secure with a satin scarf, then add oversized clips or a jeweled headband.
It instantly reads confident and playful, and I can dress it up or down in seconds.
Curly updos can be styled quickly for textured hair with simple accessories like scarves or clips, making them a go-to for effortless curly updos.
Braided Crown Updo for Everyday Elegance

Nothing lifts my look faster than wrapping a braided crown around my head — it’s elegant without feeling fussy. I love how it frames my face, keeps edges neat, and shifts from errands to meetings without drama.
I braid loosely for softness or tighter for structure, add a subtle jewel if I’m feeling fancy, and enjoy the polished, effortless vibe every single day. Cornrow updos are a versatile option that can be styled for both casual and formal occasions, showcasing effortless cornrows as a chic protective choice.
Bantu Knot Updo With Modern Twist

Bantu-knot revival is my go-to when I want a look that’s bold but still wearable — I twist small, playful knots across my scalp and then loosen a few for softness, or leave them tight for graphic impact.
I accessorize with gold cuffs or a silk scarf, pair with sleek edges, and relish how this modern twist feels polished, fierce, and surprisingly simple to rock. A single style can protect delicate strands while promoting growth with protective styling and ease of maintenance.
Twisted Halo Upstyle for Formal Events

When I want to feel effortlessly regal at a wedding or gala, I reach for a twisted halo upstyle that frames my face like a crown.
I twist sections around my head, pinning them neatly so stray curls peek just enough.
It’s polished but playful, stays put through toasts and dancing, and instantly elevates any gown—confidence in a chic, low-fuss package.
For added versatility, this updo can be adapted into several elegant updo hairstyles to suit hair texture and length.
Faux Hawk Updo With Tapered Sides

Okay, let’s play with a faux hawk that’s all attitude—I’ll walk you through the tapered side technique so your sides sit sleek and sculpted.
Then I’ll show the simple faux hawk styling steps to build height and texture without breaking a sweat.
Believe me, this combo gives you edge and polish if you’re heading to brunch or a night out.
Tapered Side Technique
Let’s get bold: I love the tapered side faux hawk because it’s equal parts edgy and effortless, sculpting the sides close while leaving a voluminous ridge down the center you can style sleek or textured.
I’ll tell you why the taper matters: it frames your face, reduces bulk, and gives contrast that makes the ridge pop—clean, modern, and utterly confident.
Faux Hawk Styling Steps
You’ve seen why the tapered sides make that faux hawk sing; now I’ll walk you through the styling steps so you can recreate it at home.
I start with clean, moisturized hair, section the crown, clip sides down, and use a light pomade to sculpt the ridge. Twist or braid the center for texture, pin ends, and finish with a strong-hold spray.
Cornrow Feed-In Updo for Long-Lasting Hold

I love how a cornrow feed-in updo gives you serious staying power when the braids are tight and even.
I’ll show you how strategic feed-in placement builds shape without bulk, and how to control tension so your scalp stays happy.
Stick with me and you’ll get a slick, long-lasting look that feels as good as it looks.
Tight, Even Cornrows
Tuck, feed, and tighten—those are my go-to moves when I want cornrows that actually last.
I keep rows neat, scalp-hugging, and uniform, checking tension as I go so edges stay sleek without pain.
I use a light gel, smooth each part, and trim stray hairs.
The result? A polished, confident updo that holds through busy days and turns heads.
Strategic Feed-In Placement
Start by mapping where each feed-in will sit against my scalp so the added hair follows the natural flow of the cornrow and doesn’t bunch or pull.
I place feed-ins slightly ahead of the braid path, snug but not forced, layering lengths for seamless shift.
I check symmetry, stagger bulk to prevent lumps, and secure ends discreetly so the updo stays sleek and confident all day.
Scalp-Friendly Tension Control
Now that I map each feed-in and stagger the bulk, I pay close attention to how much tension I’m putting on the scalp so the updo holds without hurting.
I ease pressure near the hairline, anchor with looser stitches, and redistribute pull across sections.
That way my cornrow feed-in updo stays secure, comfy, and damage-free—style that lasts and keeps my scalp smiling.
Textured Top Knot With Face-Framing Pieces

I always reach for a textured top knot with face-framing pieces when I want style that’s effortless but still looks intentional; it gives me the polished height of a bun while those loose tendrils keep things soft and modern.
I tease the crown for texture, secure a messy knot, and pull delicate pieces around my face — chic, quick, and endlessly flattering for meetings or nights out.
Goddess Braids Styled Into a Chic Bun

If you like the effortless polish of a textured top knot, you’ll love how goddess braids bring that same polished vibe with more structure and drama—minus the fuss.
I twist long, glossy braids into a high or low bun that lasts days, tucking ends for a sleek finish. It’s regal, protective, and perfect when you want statement hair without constant touch-ups.
Low Chignon With Soft Finger Waves

When I want a look that’s quietly glamorous, I pull my hair into a low chignon and sculpt soft finger waves around the face to give it that old‑Hollywood sway with a modern edge.
I love how the waves frame my cheekbones while the chignon keeps things polished—perfect for date night or a slick work event. Quick, chic, and surprisingly easy to refresh.
Side-Swept Updo With Voluminous Curls

I’m all about building a strong base for a side-swept updo, so I’ll show you quick prep and volume tricks that actually last.
Then we’ll talk curl placement—where to pin those bouncy curls to frame your face and keep the silhouette balanced.
Stick with me and you’ll learn how a few strategic lifts and pins turn curls into head-turning glam.
Prep and Volume Techniques
With a few simple prep steps, I get your hair ready to hold serious volume without feeling stiff or crunchy.
I lightly mist a root-lifting spray, apply a weightless mousse through mid-lengths, then blow-dry with a round brush for lift.
I diffuse ends to keep texture, tease gently at the crown, and finish with a flexible-hold spray so curls move but stay bold.
Curl Placement Tips
Because curl placement makes or breaks a side-swept updo, I plan each curl like I’m setting a tiny, dramatic accent—aiming for balance, movement, and a touch of asymmetry.
I tuck heavier curls near the nape, let lighter ones cascade by the face, and pin strategically so volume reads intentional.
Play with direction and tension; small shifts transform vibe from soft-glam to bold.
Marley Twist Updo With Decorative Beads

Brushing my fingers through chunky Marley twists, I love how adding a few decorative beads instantly turns practical hair into party-ready art.
I loop twists into a high bun, weaving beads along front pieces for playful sparkle.
It’s quick, low-maintenance, and feels classy-cool.
You can mix metallics and wooden beads for texture, securing everything discreetly so the style lasts through dancing and meetings.
Flat-Twist Crown With a Sleek Finish

I’ll walk you through prepping and clean parting so your flat-twist crown starts flawless. Then I’ll show how to execute neat, tension-balanced twists that hug the scalp without pulling.
Finally, we’ll finish with slick edges and a shine routine that keeps the look polished all day.
Prep and Parting
With gentle fingers and a trusty wide-tooth comb, I prep the hair so every strand sits obediently for the flat-twist crown; this means detangling from ends to roots, dampening with a light leave-in, and smoothing edges with a little gel so the finish stays sleek.
I create a clean part line, clip sections neatly, and check tension—ready to twist without frizz.
Executing Flat Twists
Once the part is crisp and the product’s settled, I start the flat twists at the nape and work upward, keeping each stitch tight but not painful so the crown sits smooth and close to the head.
I coax edges, rotate sections, and secure ends discreetly.
- Keep tension consistent
- Twist toward the crown
- Smooth flyaways gently
- Pin as you go
Sleek Finishing Touches
Usually I finish the flat-twist crown by dialing in the sleekness—so I smooth, refine, and lock everything in place without overworking the hair.
I use a lightweight gel, a boar-bristle brush, and careful edges to keep the silhouette clean.
A satin scarf sets the shine, and tiny pins hide stray strands.
The look stays polished, modern, and totally confident.
Box Braid Updo With Bold Color Accents
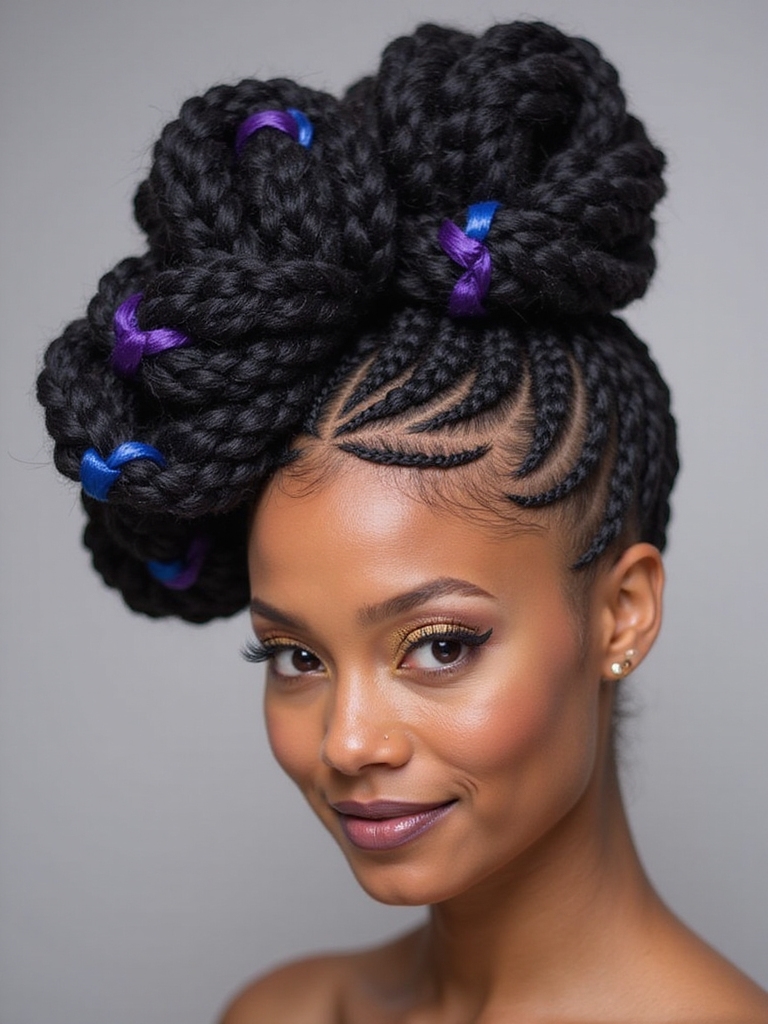
I love how a box braid updo with bold color accents instantly turns a practical protective style into a statement—think sculpted buns, high crowns, or braided halos punctuated by flashes of electric blue, magenta, or sunset orange.
I’ll show you how to play with placement, contrast, and texture so your updo pops without shouting.
- Strategic color placement
- Clean parting tricks
- Playful accessory picks
- Long-lasting hold tips
Tuck-and-Roll Updo for Natural Hair

Let’s tuck and roll our way into one of my favorite quick-updo moves for natural hair — it’s deceptively simple but looks polished and intentional every time.
I twist sections, tuck ends under, secure with pins or a comb, then smooth edges with gel.
It’s flexible for texture and length, fast for mornings, and always feels effortlessly chic when I need a confident, low-fuss look.
You’ve just toured a lineup of updos that shout confidence while keeping your hair healthy — sleek buns, high puffs, crowns, twists and braids with all the fun extras. Try one, mix a few, or invent your own mashup with cuffs, color, or a satin scarf.
Either way, you’ll look polished and powerful. Go ahead: pick a style, rock it loud, and watch how your hair (and mood) level up.


