
I love winter styles that balance warmth and polish—think sleek low buns, polished low ponytails with a wrapped twist, and textured scarf-friendly waves that stay put under knits. I’ll show you braided crowns, cozy knotted headbands, voluminous blowouts that last, and easy braided buns for commutes.
I favor lightweight serums, heat protectant, and flexible-hold mist to keep hair smooth without stiffness. Keep going and I’ll share simple steps, product tips, and quick finishes to make each look last.
Sleek Low Bun for Windy Days
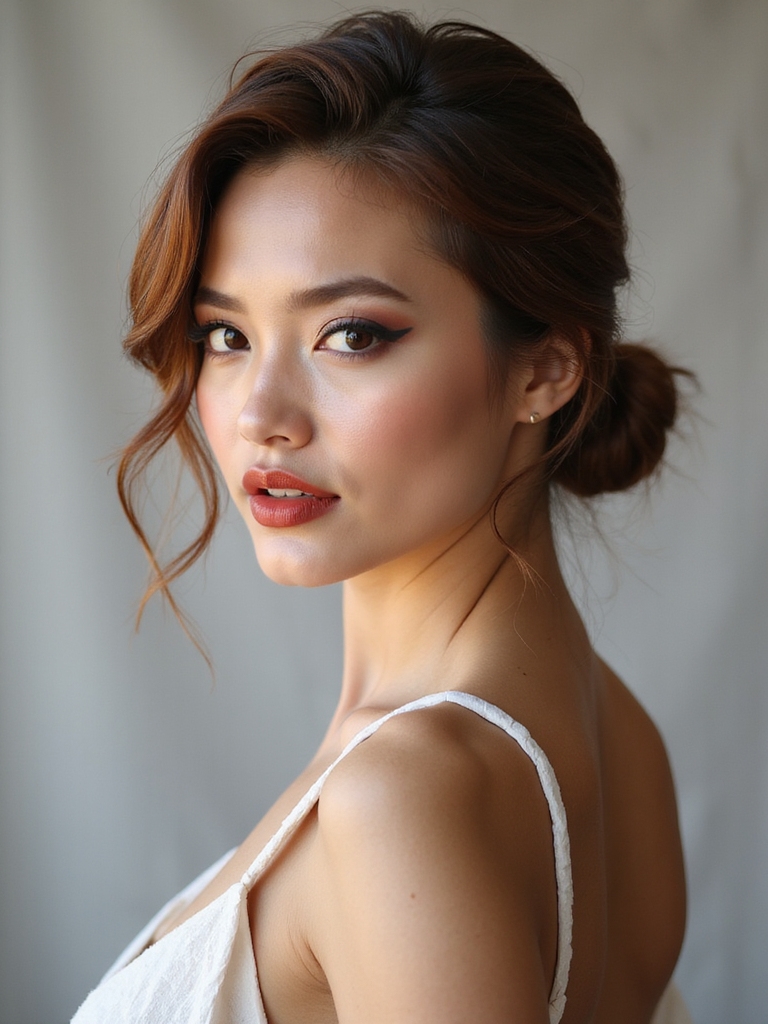
Tuck your hair into a sleek low bun and you’ll stop fighting the wind without sacrificing polish.
I’ll show simple steps: smooth with a lightweight serum, part where you like, gather at nape, twist and secure with pins and an elastic.
Finish with a mist and tuck flyaways.
It stays neat under coats and scarves while looking intentionally refined.
For a bridesmaid-ready alternative, consider an elegant structured updo with a high bun for more formal events and added height structured high bun.
Textured Scarf-Friendly Waves

With a cozy scarf in mind, I create textured waves that stay defined without getting crushed — perfect for slipping on a chunky knit.
I rough-dry, add sea-salt spray, and twist sections with a medium iron for loose S-shaped bends.
I finger-comb and set with a flexible-hold mist so the texture peeks from beneath scarves and lasts all day.
These techniques are great for achieving beach curly hairstyles that hold shape and texture under layers.
Cozy Knotted Headband Hairstyle

For chilly days when I want my hair off my face without sacrificing style, I reach for a cozy knotted headband to elevate even the simplest looks.
I tuck loose strands, position the knot slightly off-center, and adjust volume at the crown for balance.
It’s quick, polished, and pairs perfectly with coats and scarves—no heat styling required, just gentle texture and confidence.
Headbands can instantly transform an updo by adding instant polish to any hairstyle.
Polished Low Ponytail With a Twist

I smooth my hair into a low ponytail, then wrap a small twisted section around the base to hide the elastic and add an elegant, modern finish.
I tug gently at the twist for softness, mist with light-hold spray, and tuck flyaways with a serum.
This look’s quick, sleek, and pairs perfectly with scarves or structured coats for polished winter outings.
Polished half-up ponytail styles can add an effortless chic to any outfit, emphasizing face-framing layers and clean lines with a polished twist.
Voluminous Blowout That Lasts

For a voluminous blowout that actually lasts, I always start by misting a lightweight heat protectant through damp hair to shield strands and add slip for smoother styling.
I then dry the roots with my head flipped and a round brush, lifting and directing airflow to create long-lasting lift without crunch.
Stick to those two steps and you’ll get salon-worthy body that holds through cold, static-prone days.
Long wavy hair benefits from the extra lift at the roots to maintain shape and reduce frizz, especially for long wavy hair types.
Prep With Heat Protectant
Start by spritzing a heat protectant evenly through damp hair so I can lock in moisture and shield strands from high heat—this step’s nonnegotiable if I want a voluminous blowout that lasts.
I smooth product through mid-lengths and ends, detangle gently, then section for efficient styling.
- Choose lightweight spray
- Apply evenly
- Comb through and wait 60s
Straight hair benefits from techniques that enhance smoothness and shine, so I also focus on creating tension and direction while drying to promote a sleek finish and maintain straight hair structure.
Root-Lifting Drying Technique
With my head tilted forward and sections clipped out of the way, I blast the roots with warm—not scalding—air while lifting each section at the scalp with my fingers or a round brush to create instant lift and long-lasting volume.
After drying, I smooth mid-lengths with a cool shot, tease lightly at the crown, and finish with lightweight spray for hold without stiffness.
Fresh winter haircuts can amplify this effect when tailored to face shape and hair texture, like a layered bob for volume at the crown with root-lifting techniques.
Side-Swept Braided Halo

For a side-swept braided halo that holds up in winter, I start by prepping with lightweight texture spray and a bit of blow-dry roughing to give grip without stiffness.
I’ll walk you through easy braiding technique tips—how to keep tension even and create that soft, crescent shape—then show the best ways to secure the braid so it stays put.
Finally, I’ll cover finishing touches: discreet pins, a flexible-hold spray, and gentle pull-aparts for polished, cozy visuals.
Braids like the halo are a staple of elegant braided hairstyles that suit both casual and formal winter looks.
Prep and Texture
I’ll begin by prepping the hair so the side-swept braided halo holds its shape and looks effortless all day.
I work on clean, slightly textured hair, using lightweight mousse and a dry-texture spray to give grip without stiffness.
Then I rough-dry for movement and finger-comb before braiding.
- Light mousse
- Dry-texture spray
- Rough-dry and finger-comb
Braids can be adapted for any look, and mastering basic braided hairstyles will make this style easy to customize.
Braiding Technique Tips
Let’s break the halo down into simple steps so you can braid confidently and keep the side-swept shape intact.
I start by parting deeply to one side, feeding hair into a Dutch braid across the crown, keeping tension firm but relaxed.
I loosen the braid slightly for volume, guide it toward the opposite ear, and blend face-framing pieces for a soft, polished finish.
Practice the basic Braided Headband technique with loose hair first to master tension and placement.
Securing and Finishing
Now that the braid sits where I want it, I secure it thoughtfully so the side-swept halo keeps its shape without feeling stiff.
I tuck ends, hide pins, and mist lightly for hold that looks effortless. Follow these finishing touches:
- Use discreet bobby pins, crisscrossed for grip.
- Apply light-hold spray from distance.
- Gently pull loops for soft volume.
Messy Top Knot With Face-Framing Pieces

I often reach for a messy top knot with face-framing pieces when I want a chic, low-effort look that still feels intentional; it lifts your features while the loose strands soften the face.
I gather hair high, secure loosely, then tug and texturize for volume. I pull a few curtain-like strands around the temples, mist with light-hold spray, and adjust for relaxed polish.
Smooth Sleek Bob With Deep Side Part

Cut a smooth sleek bob with a deep side part and you instantly sharpen your silhouette while keeping things modern and effortless.
I’ll show you quick steps to polish the look, from blowout to shine serum. I keep styling concise so you can recreate it daily.
- Precise cut
- Heat-protectant blowout
- Shine finish
Soft Romantic Curls for Holiday Evenings

For holiday evenings I love creating soft romantic curls that feel polished but still touchable, and I’ll walk you through prepping with heat protectant and the right tools.
I’ll show how face‑framing layers make the curl shape flattering and keep the look light around the eyes and cheekbones.
Finally, I’ll recommend products and techniques to lock the style in place without any crunchy feel so your curls move naturally all night.
Heat Styling Prep
When I prep my hair for soft, romantic holiday curls, I start by treating it like canvas—clean, dry, and detangled so the style lays smoothly and lasts through the evening.
I apply a lightweight heat protectant, section carefully, and set tools to the right temperature for my hair.
- Heat protectant
- Proper tool temperature
- Small, even sections
Face-Framing Layers
I like to frame a holiday look by carving soft layers around the face that catch the light and soften the curl pattern; they’re the little details that make romantic waves feel effortless.
I sweep shorter pieces away from the cheeks, twist ends around a small barrel for gentle bounce, and finger-comb to blend. The result reads polished, intimate, and camera-ready without fuss.
Hold Without Crunch
After framing the face, I lock in those soft curls so they stay bouncy all evening without getting crunchy or stiff. I use lightweight mousse, a medium-hold spray, and a silk scarf to preserve shape and shine while keeping movement natural.
- Apply mousse to damp hair.
- Clip curls until cool.
- Mist and wrap with silk.
Half-Up French Twist for Extra Warmth

Because my ears always get cold in winter, I love the half-up French twist for adding warmth without sacrificing style—it’s polished, stays put under a scarf, and takes just a few minutes once you know the steps.
I gather crown hair, twist inward, secure with pins and a light-hold spray.
It frames my face, keeps neck heat in, and looks effortlessly refined.
Slicked-Back Wet-Look Style

Try slicking your hair back for a chilly-day twist that’s equal parts chic and practical—I love how the wet-look keeps stray hairs tamed under a hat or scarf while still feeling modern.
I use a smoothing gel, comb through, and set with mist. Quick, sleek, low-maintenance.
- Use lightweight gel
- Comb for precision
- Finish with flexible hold spray
Loose Fishtail Braid for Long Hair

I love how a loose fishtail braid turns long hair into an effortless, polished winter look, and I’ll walk you through everything you need to know.
First we’ll cover prep and texture so the braid holds, then I’ll give clear fishtail technique steps you can follow, and finally I’ll show simple styling and finishing touches to keep it soft and neat.
Stick with me and you’ll have a cozy, camera-ready braid in minutes.
Prep and Texture
Before I start braiding, I always prep the hair so the fishtail holds its loose, textured look all day. I work on clean, slightly gritty strands and add soft volume at the roots for movement.
- Sea salt spray for grip
- Light mousse for body
- Dry shampoo at roots
Then I gently roughen lengths with my fingers before styling.
Fishtail Technique Steps
Start by parting your hair where it falls best and gather it over one shoulder so you can work comfortably; I like to keep the part slightly off-center for a softer face frame.
Split into two sections, take thin outer strands, cross them into the opposite section, and repeat.
Maintain even tension, loosen slightly for a relaxed look, and secure the end with a small elastic.
Styling and Finishing
After you’ve secured the basic fishtail, I’ll show you how to shape and finish it so it looks effortless and polished.
I gently tug sections to loosen the braid, mist with flexible hold spray, and hide the elastic with a ribbon or wrapped strand for a refined touch.
My go-to steps:
- Pancake for volume
- Secure and conceal elastic
- Set with light mist
Retro-Inspired Victory Rolls

I love how victory rolls turn a chilly outfit into something glamorous, and they’re simpler than they look once you get the technique down.
I show step-by-step: section the front, backcomb slightly for grip, roll toward the scalp, and pin securely.
Finish with light hairspray and a satin scarf for polish.
They elevate coats and knitwear without seeming fussy.
Easy Braided Bun for Commutes

If you like the vintage flair of victory rolls for weekend looks, you’ll appreciate how a simple braided bun keeps hair neat and stylish on hectic commutes.
I braid quickly, coil the plait into a low bun, and secure with pins for all-day hold.
Try these small tweaks:
- Tight three-strand braid
- Smooth sides with light serum
- Hidden elastic for clean finish
Accessorized Low Chignon With Pins

For a polished, low-effort look I turn to an accessorized low chignon with pins—it’s quick, secure, and instantly elevates any winter outfit.
I twist hair into a low knot, anchor with discreet bobby pins, then add decorative pins or jeweled clips for sparkle.
It stays neat under scarves, shifts from day to evening, and requires minimal touch-ups—perfect when you want effortless polish.
I’ve tried every winter hairstyle here and found a surprising truth: the prettiest looks aren’t about perfection but about resilience. When wind, scarves, and busy mornings threaten your style, these easy, polished options adapt — they’re forgiving, quick, and still photo-ready.
So try them, tweak as you go, and trust that a little texture, a smart pin, or a low bun can make you feel put-together all season, no fuss required.


